For most Christian bloggers, SEO wasn’t something that you understood or even worried about in the early days of launching your site. But hopefully, you eventually started learning how it works and are now writing content using sound SEO practices.
- What to do with older blog posts?
- Should I republish old blog posts?
- Why should I update older blog posts?
- How do I update older blog posts?
But what about all those older posts that really only got traffic the day you published?
Part of your SEO strategy should include a plan for updating some of those older posts to make them more SEO- friendly and Pinterest-friendly. Here are 11 things to do when updating older posts for SEO on your Christian blog.
This post may contain affiliate links. Read our full disclosure here.
Updating Older Posts for Better SEO
If you have been blogging for some time (at least a year or longer), chances are you have a lot of older content that isn’t generating any organic traffic. And you are most likely more focused on publishing more new content.
But updating that older content for better SEO can also boost your organic traffic.
Why Update Older Blog Posts?
While new content is definitely something to work on, you are often sitting on a goldmine of potential traffic by simply updating the content you already have to make it better for SEO purposes.
Have a Plan
When getting ready to start updating older posts for SEO, it is important that you have a plan. Don’t just randomly start picking posts to update. You should run each individual post through Ahrefs to see if are indexed for any keywords.
Watch this video to see how to do that.
Even if your post isn’t on Page One of Google search results (which is why it isn’t getting any traffic), the post may actually be indexed for some keywords on Page 2, 3, or beyond.
- Create a spreadsheet of ALL post URLs for your site
- Run each one through Ahrefs
- Make note of completely dead URLs (they have no indexed keywords)
- Make note of the ones that DO have indexed keywords
- Begin updating the blog posts that did have indexed keywords.
Once you’ve updated all of those, you can slowly begin looking at the dead ones to see how you can rewrite them to actually answer a search query.
How to Update an Older Blog Post
Ok, now that you’ve figured out exactly which older posts to start updating, you may be wondering exactly HOW to update them.
When you ran the URL through Ahrefs, you should have made notes on the ranking keywords that were indexed but not on page one. This will be the basis for how you update the content.
There are a couple of different ways to update older content:
Keep in mind that when you first wrote these posts, you probably didn’t understand SEO. You also probably didn’t understand that each blog post needs to satisfy a search query and not just be your thoughts and opinions about something.
- Make minor edits to your headings and content using the noted keywords.
- Create a brand new outline and rewrite the entire post from scratch.
For most older content, you should most like just create a new outline and rewrite the content. Why? Because the current post most likely isn’t actually satisfying a search query.
1. Create a New Outline and Draft Post
I would recommend writing out the new outline and draft in a Word document or Google docs. Once you have finished it, you can simply delete the contents of the current post and paste the new draft into its place.
If you aren’t familiar with how to create an outline, you can review this tutorial about headings and how to use them.
This video walks you through the steps of creating a really solid outline for the post using “people also ask” questions and additional keywords.
Once you have created the outline, begin filling it in with the content.
2. Fine-Tune the Post
Once you have copy/pasted the new version of the post into WordPress (after deleting the original version), there are some additional things you’ll want to make sure to update.
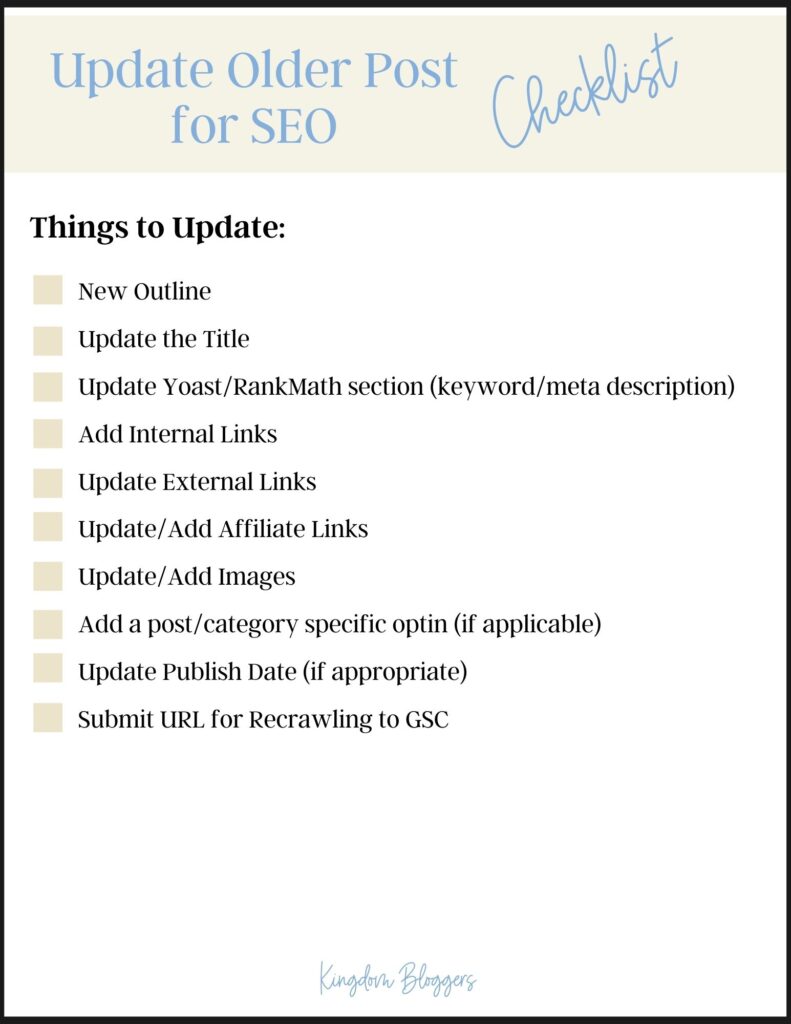
Update the Post Title
If your original post title wasn’t very creative or catchy and/or didn’t really have the SEO keyword in it, you’ll want to edit it to make it better. Remember, when your updated post makes it to Google search results, a great title is what gets readers to click on it.
Update Keyword Information
Go to the Yoast or RankMath section of the blog post and update the following boxes:
- keyword/keyphrase
- meta description
Don’t worry about whether you are getting a green light or a passing score with this plugin.
**Do not change the slug for the post even if the old slug doesn’t have the right keyword. Changing the slug changes the entire address for the post. If you do change it, you’ll need to install a redirection plugin so your old links won’t cause error codes.
Update Internal Links
As you are updating an older post for SEO, be sure you are checking any internal links that are in it. Make sure that you are linking to other posts in the same category – preferably by using anchor text that has SEO value related to the content of the destination post. Since writing all the older content, you’ve most likely written quite a bit of newer content that could be linked in those older posts. This is important for SEO, but also for giving readers links to click through to more related content.
Related: The Importance of Internal Linking
Update External Links
Check all other outbound (external) links in the post. These could be links to other blogs or regular websites. Make sure they are still valid sites. Also, make sure that all external links are set to open in a new window.
Update Affiliate Links
As you are updating older posts for SEO, be sure to check any affiliate links that you may have added.
- Make sure they are still valid. If not, change them out for new ones.
- Make sure all affiliate links are “NoFollow” and are set to open in a new window.
- Make sure your affiliate disclosure is visible on the post.
If you didn’t have affiliate links in the older posts and are now monetizing, be sure to add an affiliate link when updating the post (when appropriate).
Update/Add Images
Be sure to update the mages on those older blog posts! Be sure that you have permission to use any images that you’ve uploaded. Never just grab an image from Google because those often have Copyright and you can get in hot water for doing so. It is best to get your images from free sites, stock photo subscription sites, or simply take your own images.
- Make sure the images have the correct alt text. This should be an actual description of the image for blind reader software to “read” the image.
- If you have a printable that goes along with the content, be sure to upload the actual printable to the post. (People do search for printables in Google image searches). The alt text for a printable can simply be the name of the printable (i.e., prayer journal template).
As you replace any images in the post, be sure to delete the original image from your media library so it doesn’t take up storage space on your server.
If you have content such as “Prayers to Pray for XXX” or “XX Bible Verses About XXX” or similar types of content, create a few images (I use the IG template) with some of the bible verses or prayers on them and upload them to the post between paragraphs. With these types of images, you use the name as the alt text (prayers for XXX).
You can get image search traffic even if your actual blog post never makes it to page one results!
Edit Publish Date
If your permalink structure has the date in it (the date shows in the blog post URL), DO NOT edit the publish date because it will completely change the URL for the post. If you do this, you will have to use a redirection plugin.
Since search engine crawlers prefer new content, it is a good practice to edit the publish date when you make major edits to an older post. Once you make the edits, simply change the publish date to the current date and hit “update.”
Add a Good Optin
I don’t recommend working on building your email list until you are generating consistent monthly organic traffic. That usually comes after a solid year of blogging with SEO in mind.
But if you are to that point, then while you are updating a post, you can go ahead and add your subscriber optin form to the post.
Submit for Recrawling
Once you get everything updated and published with the new date, submit the URL to Google Search Console to expedite the recrawling of it. This will send the crawlers over to recrawl the content so it can (hopefully) boost its ranking with Google (and maybe get to page one!).
Updating Older Posts for SEO Can Boost Traffic
While the primary focus of your blog strategy should be to create brand new content, there is significant value in updating those older posts for SEO. These older posts shouldn’t be forgotten because you did put effort into writing them. Setting aside time to go back and make some edits and tweaks, can have a significant impact on increasing your organic.
Don’t worry about updating them all at once! Simply add this as part of your regular blog content plan and balance it with writing new content. Also, as you do write new content, be sure that you are including links to those older posts (when they are relevant) which will also boost page views and traffic to them.
